
When camping, you want to enjoy the sun, nature, and nostalgic moments, such as enjoying a delicious piece of Bannock bread. In a frying pan or on a stick, we show you how to cook it over the campfire . . . and awaken your inner child!
From early explorers to Indigenous peoples
The origin of Bannock, as we know it today, is believed to date back to the first European explorers, more than 500 years ago. Although Indigenous peoples already had their own version of Bannock at that time, the introduction of wheat flour enhanced it with an important source of carbohydrates, thus providing them with that extra dose of energy.
Today, Bannock has become widely consumed because of how simple it is to prepare; it doesn’t require yeast or kneading. This bread is particularly well suited to cooking over a campfire. No wonder it has become a camping classic! Crunchy on the outside, tender on the inside, Bannock is a delight for both young and old alike.
You knead to give it a try!
Bannock has many variations, and can be enjoyed in both sweet and savoury versions. To prepare the basic recipe, simply follow these proportions:
- Two cups all-purpose flour
- One cup water
- Two tablespoons baking powder
- Three tablespoons sugar
- A pinch of salt
To prepare, mix the dry ingredients in a bowl, then gradually add the water. Combine until the mixture resembles a paste. You can also let your creativity run wild and add spices, seeds, nuts, or dried fruit.
A campfire treat
While Bannock can be prepared in a conventional oven, it’s always more fun to cook it over a campfire. The bread will be deliciously flavoured with a slight smoky taste.
For a softer bread, use a buttered or oiled cast-iron pan placed directly on the coals or on a grill, turning the dough several times during cooking.
No pan? No problem! The dough can be cooked by spreading it on the surface of a flat rock, placed near the fire.
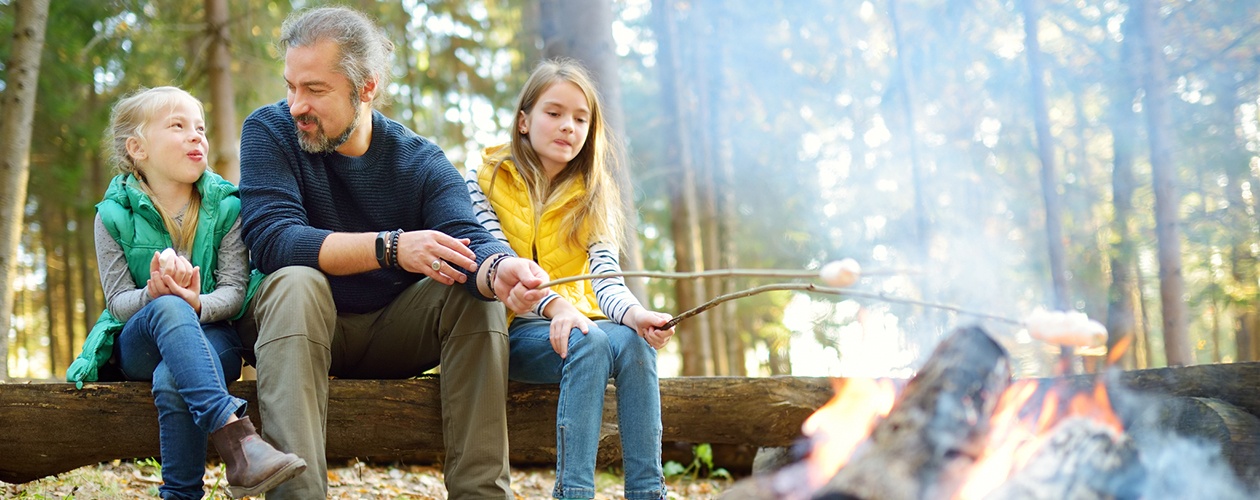
If you want to get the kids involved, try cooking your Bannock on a wooden stick (yes, just like marshmallows!). Separate the dough into quarters before wrapping each quarter around a stick. Then cook the Bannock by holding the stick above the coals and rotating it slowly, until the bread turns golden brown. Remove the bread from the stick, and stuff with your favourite spread. Yum!
How to enjoy it
Butter, jam, hazelnut spread, brie melted with honey: garnish your Bannock with whatever ingredients you love! It also pairs perfectly with savoury dishes, making it the perfect accompaniment to soups and stews prepared with seasonal vegetables.
So many fun ideas!
A camping excursion is the perfect time to unplug from devices and reconnect with life’s simple pleasures. Help your children make a herbarium to learn more about the local flora, or introduce them to astronomy through the observation of the starry sky. Here are some additional ideas to keep the whole family entertained (and delight everyone’s taste buds while you’re at it!):
- Pizza-making workshop: Camping and pizza go hand in hand! Use flatbread as a base and let the kids unleash their creativity! Want to try something new? How about our pita pizza pocket recipe?
- S’mores contest: If you like a challenge, organize a friendly little competition for the most original s’mores! Cook marshmallows over the fire first, then form a sandwich with the cookies of your choice. Let everyone add their favourite toppings, such as chopped nuts, caramel, or berries. The possibilities are endless! If you’re out of inspiration, these deluxe campfire s’mores or this s’mores cake with berries are both fun and flavourful.
- Campground cooking classes: Teach your children the basics of campfire cooking, showing them how to tend to the embers. Seize the occasion to concoct a fabulous caramel from condensed milk . . . the perfect accompaniment to skewer French toast!
To make campfire caramel, fill a large pot with water and bring to a boil over the coals. Place an unopened can of condensed milk in the boiling water (water should cover the can at all times). Cover and simmer for three hours, adding water if necessary and turning the can every half hour. Cool before opening.
You’re now ready for your next camping trip. So settle yourself around your fire and get ready to create unforgettable summer memories!

